Aka ‘The Continued Adventures of Someone From Video Compositing Land Trying To Get By Inside The Quartz Kingdom’…
Earlier Quartz Wrestling delivered a splitscreen effect which took any clip playing in VDMX, and replicated it 9 times to provide something like a video-wall. It also customised a few of the Quartz based VDMX transitions, and identified a new range of problems when creating in Quartz. After some more noodling, and helpful tips from both Dan Winckler and Joris de Jong (hybridvisuals.nl), I managed to solve some of these problems, and custom build an effect I’d wanted (attached below).
1. How to select a custom anchor point in Quartz, for rotating an image or video?
The idea here was to be able to generate rotations from a corner, or from create arcs of rotation, with the rotation centre being far below the image. None of the various Quartz patches I could find seemed to have an ability to adjust an anchor point.
The solution? “Reposition the clip so what you’d like to be the anchor point is in the center of the screen, then place it inside a 3D transformation patch, and use the rotation Z property of that patch to rotate it.” (via Joris)
Understanding three dimensional space is best done when you have at least a slithery grasp of 2D first, and it took me a while to figure out why the width of a quartz patch always seemed to fill the screen when it had a value of 2.
Welcome to the Quartz Composer coordinate system:
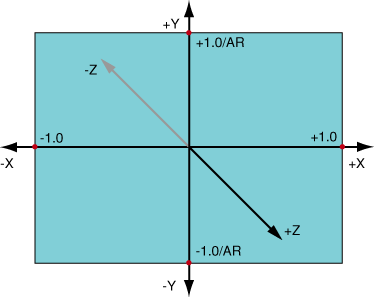
The width of a Quartz Screen is always 2, because Quartz treats the centre as 0, and gives the left and right borders of the screen the coordinates of –1.0 and +1.0. The coordinates of the top and bottom borders depend on the screen aspect ratio (AR). In the case of a 4:3 aspect ratio, the values at the borders are +1.0 / AR = +0.75 and –1.0 / AR = –0.75. ( From the Quartz Guide written by Apple’s basement dwelling engineers. See also: Quartz Composer User Guide (PDF))
Ok. So rotating a video and changing the anchor point.
The 3D transform patch that Joris suggested placing the clip inside, is a macro patch (which in Quartz have square borders, unlike the rounded corners of most patches). Macro patches can be created as usual in the Quartz editor window, but can host subpatches within them (after double clicking them. Clicking ‘edit parent’ takes the user back up the hierarchy to the editor window containing the macro patch). Below, the anchor patch with the 3D transformation macro patch:
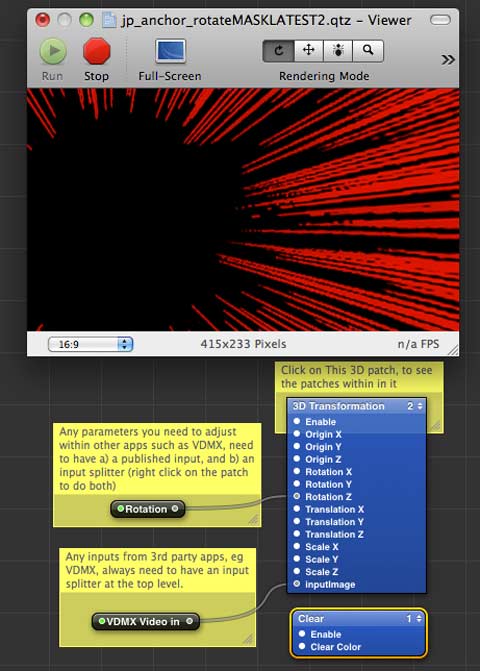
Some notes from that screenshot – the viewer window is showing the combined result of 3 layers – each of which is contained within the macro patch. One of those is an image of red manga speed lines (set as the top layer, with blend mode set to add), and the others are a VDMX input, and a mask image to frame the VDMX input. As you can see, the centre of the image is black – because there is no VDMX input at the moment. Creating quartz patches for VDMX seems to involve a weird workflow of using say a webcam ‘video input’ while building a patch, and then swapping over the ‘VDMX video input’ when saving, then testing to see how it works in VDMX, then going back to Quartz and reconnecting the webcam and making adjustments, before reattaching the VDMX input and saving again.
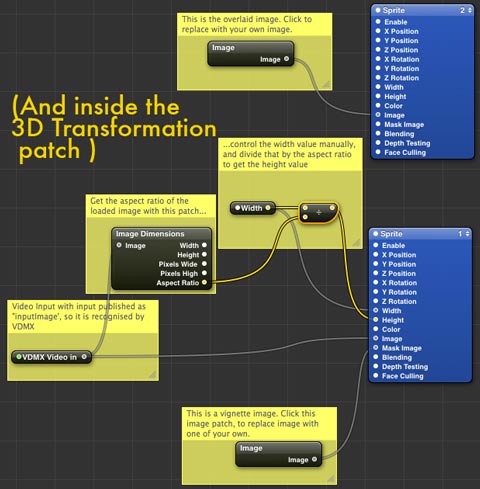
Previously I’d only been working with Billboards in Quartz, which helped avoid 3D space – billboards ‘render a quad positioned with 2 coordinates and which always faces the viewer’. I’d been routing clips and effects in patches to a billboard, which generally meant the viewer was filled with my video. So to create this anchor patch, I put a Billboard inside the 3D transform patch and set about trying to adjust the subpatch. This didn’t work, and Joris explained why:
“Billboards don’t work in 3d space, so you need to work with sprites. Sprites are basically the same as a billboard, but you need to do some of the height and width calculation yourself. I’ve attached an example of how to offset the anchor point, and how to size the sprite correctly based on different input images.”
The example included the image dimensions patch, which “gives you access to info about your current rendering environment (resolution in pixels and QC measures). You can then use the Math patch to further process this info to fit your needs. This way, when your output changes from 4×3 to 16×9 for instance, your patch will update accordingly. The QC coordination system takes a bit of getting used to, but using the RDD patch to keep things dynamic is a good practice.”
Rotations applied to the 3D macro patch, transform all of the sprites inside it, so I figured I’d try and add a few sprites and create a layered result that could be rotated at will within VDMX. Clicking on a sprite patch reveals in the settings, blend modes of ‘reveal’, ‘add’ and ‘over’. And I figured PNG images with transparency, or videos with alpha channels would allow masking and compositing within Quartz. After a bunch more trial and error, some blending tips via Dan came in handy:
“PNGs with transparency: alpha channels aren’t respected when the Blend Mode of Billboards and Sprites is set to ‘Replace.’ Choose ‘Over’ or ‘Add’ and you’ll see your black backgrounds disappear.
Blending in general: The drawing order of renderers (layers) is determined by the little 1,2,3,n… dropdown box at the upper right corner of blue Renderer patches. Make sure your Clear patch is set to 1 (first/bottom).
Other blend modes: if you type ‘blend’ in the Library search box, you’ll see all the Photoshop-esque blend modes. Again, it’s not like a video mixer — play with the patching order (the Image and Background Image inputs) some. Better yet, make your compositions into plugins and do your mixing/blending in VDMX or another QC host app!”
And eventually, I ended up with this custom masked anchor rotation effect for VDMX – which composites whatever video VDMX is playing, underneath the speed lines, masked by a circle, into the centre of the screen and allows real-time control rotation. Which is really satisfying – custom tuning an effect for a particular purpose. I’ve included the patch below – click on the image sources to replace them with your own, play around with the 3D transform values to create your own rotation variants, and for any parameters you’d wish to access inside VDMX, publish the relevant inputs and splitters.
Download the patch (with inbuilt masks. 2.3 mb) here to play in quartz, and here to use in VDMX ( place it in your QCFX folder and it should show up).
Thanks again to Joris and Dan, who provided insights at just the right times!
Previously:
Learning Quartz Composer Part 1
Learning Quartz Composer Part 2
by j p, May 25, 2011 0 comments

